
Invite exhibitors to your event
Add exhibitors one by one or from a CSV, send their invite emails, and see who has joined and started scanning.
On this page
Exhibitors get their own Badgetrac workspace for scanning badges and exporting leads. You add them to your event, and they accept an invite to create their account. Exhibitors never see your attendee list or other exhibitors' leads.
Add and invite an exhibitor
-
Step 1: Open Exhibitors
Open your event and click Exhibitors in the left sidebar.
-
Step 2: Add the exhibitor
Click Create. Enter the Exhibitor name, Contact name and Email, then click Submit.
-
Step 3: Send the invite
Click Invite on their row. They get an email with a Create Exhibitor Account button.
-
Step 4: Check who joined
When they accept, the row shows Joined. The Scanned column shows how many badges they've scanned.
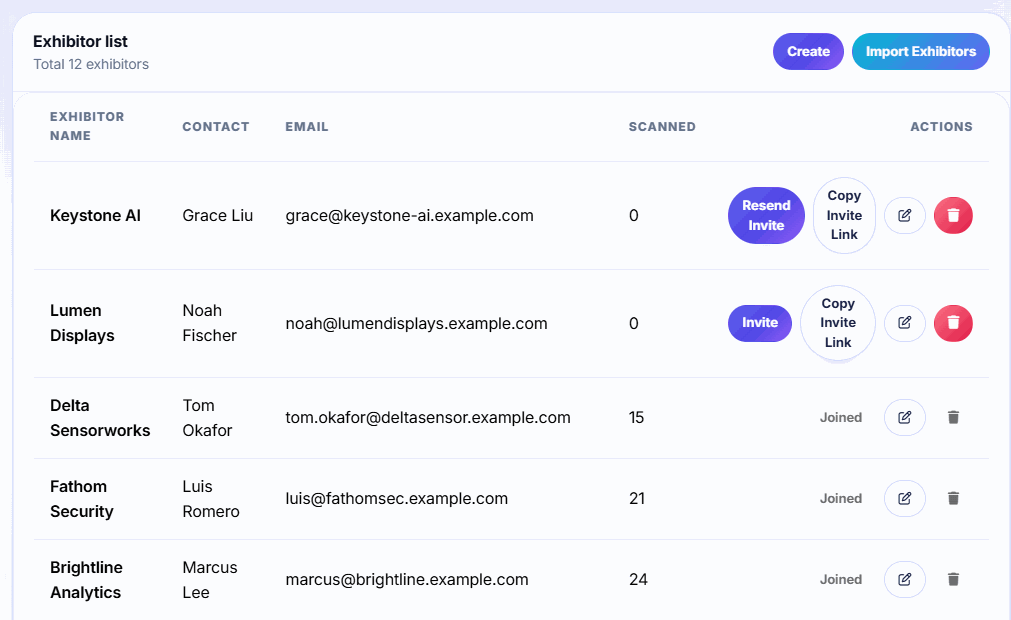
Tip: Copy Invite Link copies the same link that's in the email, so you can paste it into your own exhibitor manual. It only works after you've clicked Invite at least once for that exhibitor.
What the exhibitor receives
The email's subject is You're Invited to Exhibit at [event] via Badgetrac, and it comes from your name. When they click Create Exhibitor Account:
- New to Badgetrac: they click Sign Up as Exhibitor. The email is filled in and locked to the address you entered.
- Already have an account: they click Sign In. Their account is linked if its email matches the invite.
- Signed in with a different email: they see Access Denied. Edit the exhibitor's email and resend, or ask them to sign in with the invited address.
Once they've joined, send them Install the lead scanning app and scan badges.
Import exhibitors from a CSV
-
Step 1: Get the template
Click Import Exhibitors, then Download Example CSV.
-
Step 2: Fill it in
Keep the columns
Exhibitor Name,Contact NameandEmail, with one exhibitor per row. -
Step 3: Upload it
Choose the file and click Import. A summary shows how many were created, updated or skipped, and why.
-
Step 4: Send invites
Imports don't send email. Click Invite on each row, unless you created login accounts in the import.
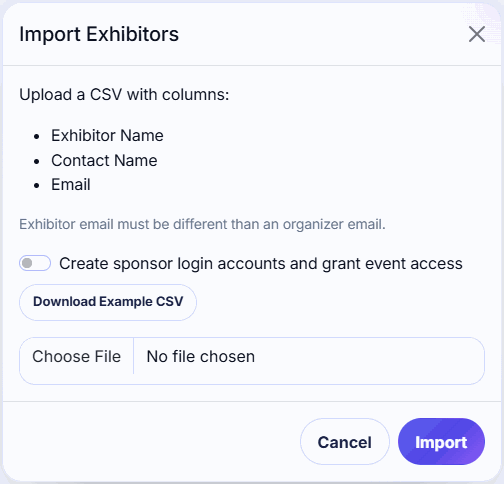
Column names aren't case-sensitive, and Exhibitor, Contact and Email Address also work. Rows with an email that's already an exhibitor update that exhibitor instead of adding a new one.
If you'd rather hand out logins yourself, turn on Create sponsor login accounts and grant event access and add a Password column (at least 8 characters) and an optional Username column. These exhibitors are marked joined straight away. Click Download account results after the import to get the list of usernames.
Rules to know
- An exhibitor's email must be different from any organizer account's email.
- After an exhibitor joins, their email can't be changed, and they can't be deleted.
- The Free plan allows 3 exhibitors per event. Every paid plan includes unlimited exhibitors, with no per-exhibitor fees.
- Duplicating an event copies its exhibitors, but you need to invite them again.
Related guides
- Install the lead scanning app and scan badges Add the Badgetrac scanner to your phone's home screen, download the attendee list, and scan badge QR codes, even offline.
- Collect exhibitor tasks with a checklist Ask exhibitors for logos, answers, confirmations and staff lists with due dates, review what they send, and let reminders chase.
- Add booths and assign exhibitors Add booths one at a time or a whole row like A1 to A20, then assign each exhibitor to their booth.
Still stuck?
Tell us what you were trying to do and what you saw. We'll help you sort it out.