
Manage volunteers and shifts
Plan volunteer shifts, build a roster, open a public sign-up form, check volunteers in on the day and give them badges.
On this page
The Volunteers page is where you plan who works when: shifts with the number of people you need, a roster of everyone helping, a public sign-up form, and check-in on the day. It builds on volunteer stations: tie a shift to a station and its volunteers see the desk link on their own shifts page.
Plan your shifts
-
Step 1: Open Volunteers
Open your event and click Volunteers in the left sidebar. The Shifts tab opens first.
-
Step 2: Add a shift
Under New shift, enter the Role (for example Registration desk), People needed, and when it Starts and Ends. Location, Station and What volunteers do are optional. Click Add shift.
-
Step 3: Repeat a shift
For back-to-back shifts of the same role, fill in Repeat a shift: From, Until and Every (hours), then click Add shifts. Only full shifts that fit before Until are created.
-
Step 4: Fill the gaps
The Filled column shows booked out of needed. Pick someone in Add volunteer… and click Add, or click × next to a name to remove them. Click Edit to change or delete a shift.
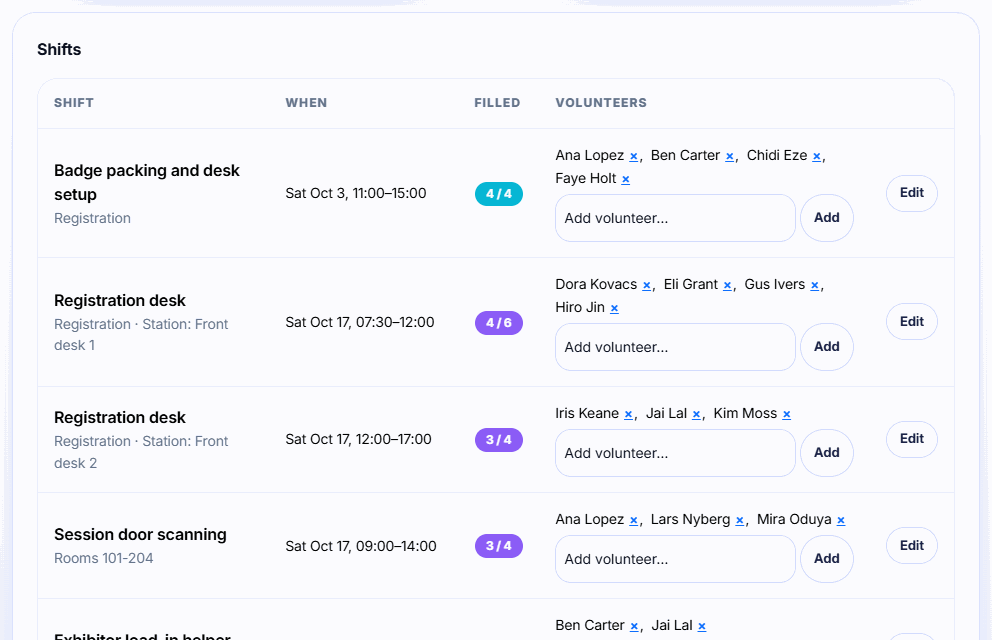
Tip: Repeat a shift makes up to 100 shifts at once. For example, From 8:00, Until 20:00 and Every (hours) 3 gives four 3-hour shifts. A volunteer can't be booked on two shifts that overlap, and a full shift takes no more bookings; raise People needed to add room.
Build your roster
-
Step 1: Add a volunteer
On the Roster tab, under Add a volunteer, enter at least a first name and email, pick a Status and click Add.
-
Step 2: Import a CSV
Under Import and export, choose a CSV with
first_name,last_name,email,phonecolumns and click Import. Download the Example CSV to see the format. People already on the roster are skipped. -
Step 3: Export hours
Click Export roster with hours for a CSV of every volunteer's status, shifts and hours worked.
You can import up to 2,000 volunteers per file, saved as UTF-8 CSV under 1 MB. Rows without a first name or a valid email are skipped. Click Edit on a roster row to change details or add private notes, and use the status menu to mark someone Applied, Confirmed or Declined.
Open public sign-up
-
Step 1: Open the sign-up settings
On the Public sign-up tab, switch on Sign-up is open and add a Message at the top of the form if you like.
-
Step 2: Choose who gets confirmed
Switch on Confirm new volunteers automatically, or leave it off and new people show as Applied on the roster until you change their status to Confirmed.
-
Step 3: Share the link
Click Save, then Copy link next to Sign-up link and share it. Volunteers see only upcoming shifts that still have open spots.
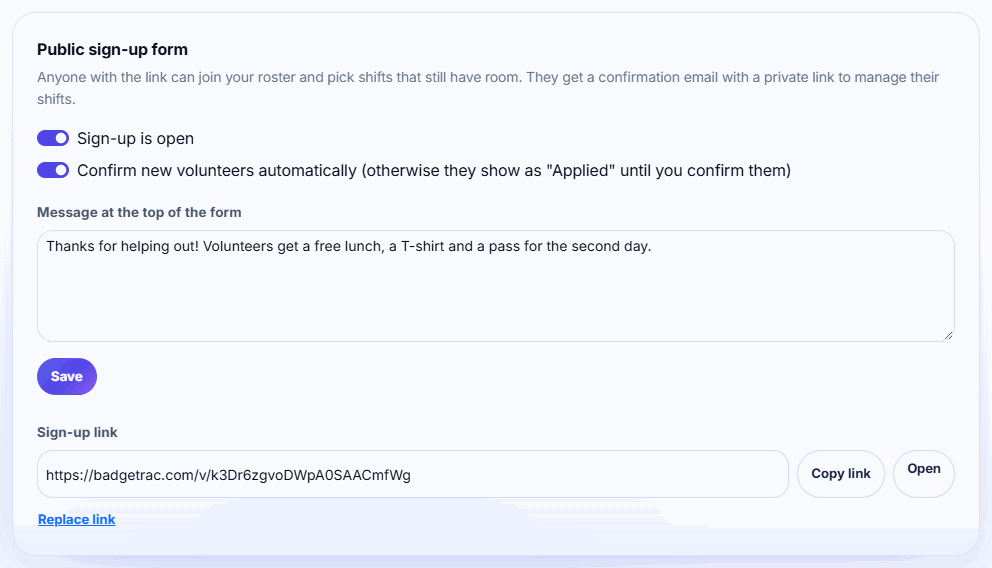
Everyone who signs up gets a confirmation email with a private link to their shifts, where they can cancel, add shifts and download calendar files. Share Sign up for volunteer shifts with them. Click Replace link if the link spreads too far: the old one stops working. While sign-up is closed, the link shows not found.
Message volunteers
On the Messages tab, choose To: All confirmed volunteers or Volunteers on one shift. Add a Subject and Message, type {first_name} to greet each person by name, and click Send. Every email ends with a link to the volunteer's shifts.
Messages need a paid plan. On the Free plan the Messages tab shows See plans instead. Sign-up confirmations and shift reminders are sent on every plan.
Automatic reminders
You don't need to remind anyone. Each booked volunteer gets one reminder email about 24 hours before each shift, with the time, what to do and, if the shift has a station, its link. Someone who books a shift that starts sooner than that gets the reminder within the hour.
Run the event day
-
Step 1: Open the Event day tab
Who's on now lists the shifts running right now, who's booked on each and their phone numbers.
-
Step 2: Check volunteers in
Under Check-in by shift, click Check in when a volunteer arrives, or No-show if they don't come.
-
Step 3: Check them out
Click Check out when they leave. Undo puts a booking back to Not checked in if you clicked the wrong button.
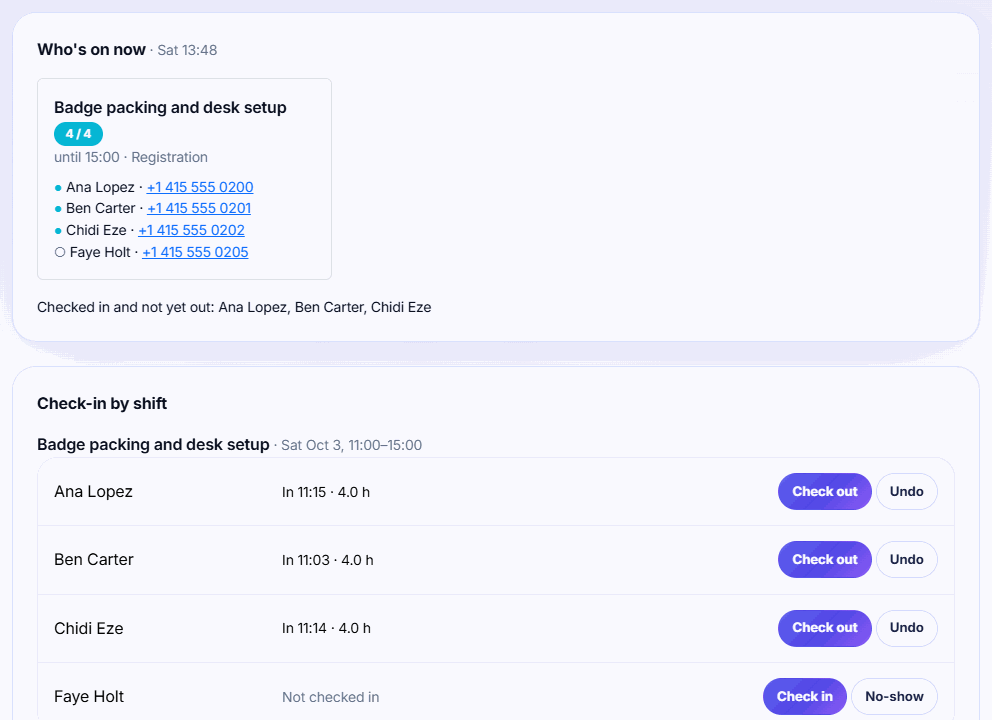
Hours run from check-in to check-out. If you check someone in but never out, they're credited with the shift's scheduled length. The roster and its export show the totals.
Give volunteers badges
-
Step 1: Confirm your volunteers
Only volunteers with the status Confirmed get a badge, so confirm everyone first on the Roster tab.
-
Step 2: Create the badges
Click Create volunteer badges on the Roster tab and confirm. Click it again after adding more people: it only creates the missing badges.
-
Step 3: Print them
The badges use the Volunteer ticket type. Print them from the Attendees page like any other badge.
Volunteer badges count toward your plan's attendee limit, like exhibitor staff badges. If creating them would take the event over its limit, Badgetrac stops and tells you. Check your plan's limit first. Volunteers who already have a ticket for the event keep it and don't get a second badge.
Related guides
- Set up volunteer stations Give each check-in desk its own link and 6-digit PIN so volunteers can search, print and register walk-ins without your password.
- Sign up for volunteer shifts Volunteering at an event? Pick your shifts from the organizer's link, manage them on your own page and find your desk on the day.
- Print badges one at a time or in batches Print a single badge as people arrive, or print a selection or every badge as one PDF before the event.
Still stuck?
Tell us what you were trying to do and what you saw. We'll help you sort it out.